Introduction
"Carbon Coat" graphene protection for metal by Carbon Method is a revolutionary coating system that prevents rust and reduces friction on the working surface of cast iron and other metal tools. Carbon Coat is a graphene coating that fills pores in cast iron and adds a nanolayer of protection that completely seals the work surface. Carbon Coat provides long-lasting protection against water, oil, and chemicals, reducing wear and eliminating rust when installed properly.
Carbon Coat replaces traditional waxes and sprays and minimizes maintenance. Carbon Coat can be used on virtually every tool in your shop. Stop waxing and get more done with Carbon Coat. Welcome to the future of nanoprotection!
Overview
Please read directions thoroughly before beginning application. If you have any questions, video instructions and contact information are available at carbonmethod.com.
For heavy use, professional shops, and challenging environments, see the "Heavy Use" sections, below, for pro tips that will help you get the best results and keep your cast iron tools rust-free and in optimal condition, even in high-use or high-humidity environments.
Apply in a well-ventilated area. Ensure that the area is controlled to prevent dust or other contaminants.
Carbon Coat is applied by hand, buffed, and allowed to cure.Choose a working area on the surface less than 6 square feet. If your work surface is greater than 6 square feet, multiple application areas are recommended. We suggest coating the tool in sections where there are natural breaks in the tool surface.

If a tool has no natural breaks in the surface under 6 square feet, we suggest breaking it into sections. Overlap these adjoining sections as little as possible while still providing coverage. This overlap can be blended into an even surface in the Leveling / Buffing step of the application process.
Carbon Coat sets quickly and has a working time of 1 to 5 minutes for each layer of application, depending on local humidity and temperature, before coating begins to cure. You will need to allow Carbon Coat to cure for 60 minutes, before applying subsequent layers, depending on temperature and humidity.
Please discard any used Carbon Method Coating Cloths. Once dried, the material is of course extremely hard, and has many grinding edges when dried into the coating cloth. This makes it a real risk for scratching any surfaces it's accidentally applied to, and just isn't worth the risk. Once the material has dried in the coating cloth, simply discard it and use another.
Removing Previous Coatings
Before the first layer of application, remove all oils, waxes, silicone sprays, polymers, or any other previously applied protection products. There are several methods of doing this: chemically, mechanically, etc. We suggest using the method you feel most comfortable with. Ultimately, you have to get down to the bare metal. During this process, remove any surface rust or stains. You can also remove any unwanted scratches at this time. Some tools come with special coatings applied at the factory; be careful not to remove these coatings. Carbon Coat can be applied right over those coatings.
After stripping previous coatings and exposing bare metal, remove all metal dust with denatured alcohol, mineral spirits, or isopropyl alcohol. Continue applying the chosen solvent to the tabletop until your rag wipes away clean. Completely remove any possible contaminations to prevent the top from potentially rusting under the coating.
1. Preparation
Even on new tools, it is highly recommended to use the Carbon Coating Prep Kit to smooth out the surface. Progress through the grits of our Abrasive Pads, using Reconditioning Oil, as instructed in the kit. This will create a semi-polished surface that enhances adhesion, longevity, and will yield a higher cross-link density in your Carbon Coat.
Put on latex or nitrile gloves and wear them throughout the duration of Carbon Coat installation. This prevents transfer of skin oils to the working surface. If skin oils are present on a cast iron work surface, rust spots will eventually form under the Carbon Coat.
Carbon Cleanse
Thoroughly spray down the metal surface with "Carbon Cleanse" decontaminator for carbon coating application. Carbon Cleanse is a proprietary blend of cleaning agents specifically designed to remove residue of solvents, oils, waxes, silicone, polymers, sap, tar, and other possible contaminants. Take a clean lint-free rag (we recommend blue shop towels) and spread Carbon Cleanse around while you wipe it up, making sure to saturate the entire surface. Repeat this process twice. Carbon Cleanse can leave streaks; be sure to buff off those streaks with a clean rag before proceeding.
2. Application
Thoroughly shake bottle of Carbon Coat graphene coating. Over time, the graphene can settle out of the solution, so shaking the bottle is important. Place cap on any bottles when not in use.
Wet the center of your Carbon Method Coating Applicator Block system with Carbon Coat, making certain to thoroughly saturate your Carbon Method Coating Cloth.

Add more as needed. Always thoroughly shake bottle before re-saturating the Coating Cloth. It is always better to apply too much Carbon Coat, as excess material can be addressed during the Leveling / Buffing step.
Create an initial "well line" by applying Carbon Coat in a straight line on your workpiece. Block in your working area by outlining a rectangle with the saturated Coating Applicator Block.
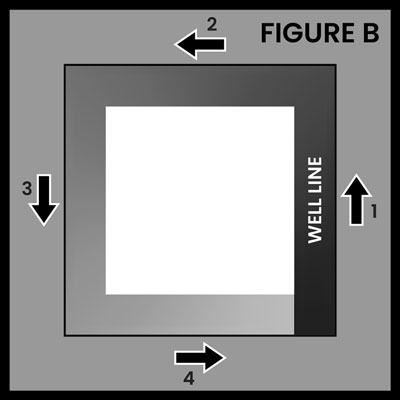
The initial application line or "well line" will contain more Carbon Coat than following strokes. It is important to draw from this “well line” during the initial layer application, in order to ensure even application.
After the working area has been blocked in, draw the Coating Applicator Block from the well line to the opposite edge of the working area, until Carbon Coat has been applied to the entire working area, making certain that no part of the working area is dry.
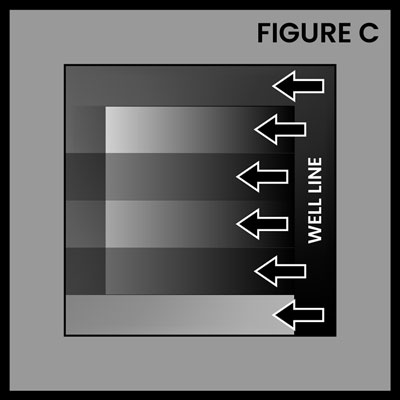
Change directions 90 degrees, and draw the Coating Applicator Block in a pattern perpendicular to the path of the initial application, alternating directions with the application.
Continue alternating directions until you feel a slight resistance. This drag or resistance develops as the solvent begins to evaporate and the coating begins to set.
Do not over-work the surface during this stage, as this can lead to scratches and uneven application.
3. Leveling
Allow the coating to set for 60 to 90 seconds, then level the coating by removing excess material. Lightly drag the beveled edge of the Coating Applicator Block across the surface; the beveled edge will give you the perfect 45-degree angle.
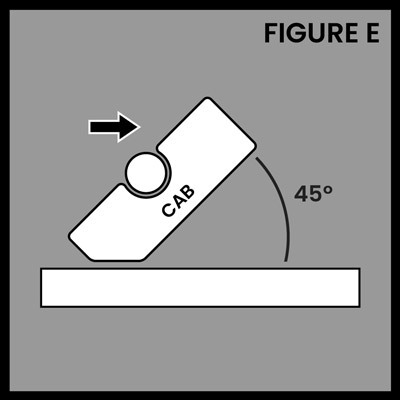
Do not apply pressure at this time. Allow the weight of the Coating Applicator Block to wick the excess material from the work surface. Allow the work area to cure for an additional 1 to 2 minutes prior to buffing. Carbon Coat will cure faster in higher temperatures and higher humidity and slower in cooler temperatures with lower humidity.
4. Buffing
Using a clean Carbon Method microfiber cloth, fold the cloth into quarters. Each buffing must be done with a clean portion of the cloth, so continue unfolding a clean quarter of the cloth for each buffing.
Lightly buff the application area, using a circular motion. Through buffing, resistance will decrease until the surface is slick - similar to buffing out a paste wax. Do not apply excessive force during the buffing stage, as this may cause uneven areas in the final finish.
5. Additional Sections
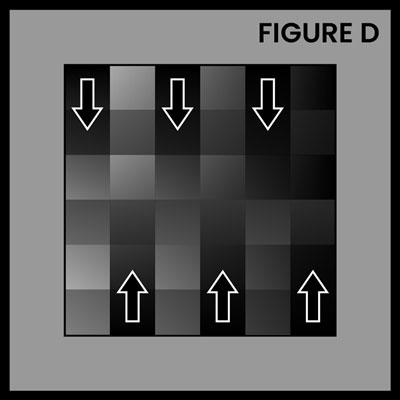
Repeat steps 2 through 4, working in up to 6 square foot sections, until the entire surface has been coated, making sure to overlap sections slightly.
6. Application of Additional Layers
For future applications, use a fresh Coating Cloth as partially-cured coating within the cloth will cause scuffing in your surface finish.
Allow Carbon Coat to cure for 60 minutes before applying additional layers of Carbon Coat by repeating steps 2 through 5. Apply a minimum of 4 layers of Carbon Coat for effective rust prevention. See our Carbon Coating in Heavy-Use and High-Humidity Shops blog for more details.
Heavy Use |
|---|
|
It takes approximately 2 layers to form a seal on a smooth surface. Each additional layer acts as a wear layer, providing added protection against corrosion and tool wear. In a high-use or high-humidity environment, it is best practice to start with a thicker initial application of Carbon Coat. 6 layers of Carbon Coat is the minimum recommendation. Starting with 6 layers will result in a thicker film build, providing more material to wear against and an increased barrier to fight humidity. |
After all desired coating layers have been applied, allow the coating to cure for at least 24 hours. The longer you allow the coating to cure, the better the results. Do not introduce water or any other liquids to a coated surface for at least 24 hours. The coatings will continue to harden for up to 7 days.
Carbon Glide
While Carbon Coat provides unparalleled protection and a very slick surface, "Carbon Glide" friction reducer for metal was developed to further reduce friction and provide an active wear layer on top of your Carbon Coat.
Wait at least 24 to 48 hours after Carbon Coat application before applying Carbon Glide . Thoroughly spray Carbon Glide onto the entire work surface. With a clean rag or paper towel, spread Carbon Glide across the entire surface. Do not apply pressure, simply spread Carbon Glide so that it is evenly distributed on the surface. Allow Carbon Glide to partially dry for 1 minute, then wipe up the excess. You can apply multiple coats if desired.
Reapply Carbon Glide as needed. We suggest weekly to monthly applications, based on use, to ensure maximum protection and slickness.
Heavy Use |
|---|
|
Regular applications of Carbon Glide add an extra protective layer, reducing wear on the Carbon Coat itself. Applying Carbon Glide is quick and easy. When you feel an increase in friction, simply spray more Carbon Glide. In a high-use environment, spraying Carbon Glide weekly or even daily will yield excellent results. |
Maintenance
For best results, reapply 1 to 2 layers of Carbon Coat every 6 to 12 months depending on use of the tool. This reapplication will serve to fill any micro-scratches and ensure continued protection and performance.
To re-apply, remove all dust from the work surface and repeat steps 1 through 6 above.
Heavy Use |
|---|
|
For Carbon Coat to be effective in the long term, we have to replace the layers that are worn off due to use. The key is to reapply on a schedule before we see any corrosion. In a high-use environment, wear on the coating will happen faster, so reapplication will need to be more frequent. If you run a lot of board-feet across your tools, or if you are protecting tools in a professional shop, add an additional 4 layers of Carbon Coat every 6 months. |
Storage
Store all products in original packaging, including tubes where applicable. Prevent from freezing.
Frequently Asked Questions
What is the temperature range for applying Carbon Coat? The minimum temperature we recommend is 50 °F. At the lower end of the temperature range, we recommend waiting 90 minutes between layers.
A couple of electric forced air heaters pointed at the surface of the tool will heat up the air around the coating and provide some humidity for the coating to bond. This should be sufficient for a proper bond and cure.
There isn’t really a maximum temperature. However, when it gets warm - 80 °F+ - working times will decrease dramatically, making application more difficult. You will need to work quickly when applying Carbon Coat. You will also need to be more diligent when buffing. Waiting more than 60 seconds before buffing could make buffing difficult, as the coating will be further along in the curing process.
How do I recoat my previously-coated tools? Recoating is simple. Just spray the coated surface with Carbon Cleanse, spread it out, and wipe it off. Allow any leftover moisture to evaporate. Repeat this process to ensure all residual waxes, sprays, or other contaminants are removed. Then apply another 2 to 3 layers of Carbon Coat following the same process as previous coatings.
How often do I need to apply Carbon Glide? Carbon Glide is reapplied as needed. Each tool, cast iron surface, and use operation is different and thus will have different wear characteristics. As you notice friction is increasing, simply spray more Carbon Glide, spread it out evenly, and then wipe it up. Keeping up on Carbon Glide applications will reduce wear on the Carbon Coating and will extend its life significantly.
Can I wash the buffing towels and coating cloths? No, it is best to not introduce our coatings to your water supply. Throw your used coating cloths in the trash. We like to reuse the buffing towels for glue cleanup in the shop.
What surfaces can I apply Carbon Coating to? We have successfully applied Carbon Coating to cast iron, stamped steel, aluminum, brass, stainless steel, phenolic wood, anodized, and powder coated surfaces.
Additional Questions?
Contact us by calling 616-366-4232 or emailing cs@carbonmethod.com.